Which Foot?
- Renée~A Day of Sewing

- Aug 6, 2022
- 3 min read
Sewing machines come with many additional accessories
that can be mind-boggling to the new sewist.
Here is the low down on all those confusing optional pieces.
Presser Feet: Your sewing machine will come with at least 4-5 presser feet.
(Feet pictured below)
Standard or ZigZag Foot: The standard presser foot that's included
with every sewing machine is the jack of all trades. It's used for standard and decorative stitches and will probably be the foot you use the most. This foot is usually capable of basic fancy stitches, satin stitch, zig zag stitches and overcasting stitches in addition to a straight stitch.
Decorative Stitch Foot: Looks like the standard foot but has a bigger mouth for the needle to move around for more complicated decorative stitches. If your machine does monogramming, it is best to use this foot too.
Zipper Foot: The zipper foot allows you to sew on either side of the zip tape with out going
over the zipper teeth. You can also use the zipper foot to attach trimmings that have a tape,
such as piping.
Buttonhole Foot: This is typically the long plastic foot that you have no idea what to do with. On one end there is a movable part that allows you to place the button in so the machine knows what size to make the buttonhole. The mouth has red marks so you can line up the bottom placement for your buttonhole. Most sewing machines will sew backwards first when starting to make a buttonhole.
Button Fitting Foot: This foot is #sewmuchfun, it sews on buttons!! I prefer my students learn to hand sew on buttons, but this is a fun alternative. Placement needs to be exact for this foot to work properly and not break a needle going down on the button. Please read the manual for correct machine settings before trying out.
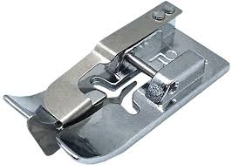
Overcasting Stitch Foot: Actually, never use this foot, but it might be helpful for some. There is a built in edge on the bottom of the foot to help you keep tight to the edge of the fabric when doing an overcast or zigzag finishing stitch.
Blind Stitch Foot: This foot also has an edge on the bottom to keep you on the fold of fabric to hem a garment with blind stitch, meaning it sews on the inside of the garment but you do not see the stitch marks on the right side of the garment.
Other Accessories Included:
Seam Ripper: I always tell my students, this will become your best friend. I say this because no matter how fabulous a seamstress you are, there will be a sewing mistake that you need to take out. The seam ripper helps take out the stitches easily.
Extra Bobbins: Make sure not to loose the bobbins, machines take their own size bobbin. The bobbin thread catches the top thread to make a stitch. It is typically best to match the bobbin thread with the top thread, so having a few extras is handy.
Extra Needles: Sewing machine needles are universal sizes, so you can easily purchase more, but the machine comes with a few extras. It is recommended to change your needle every 8-10 hours of sewing, or for every new project. Also, sometimes you need to change the size of needle to work best with your fabric.
The flat back side of the top of the needle faces towards the back of the machine when installing.
Cleaning Brush: Great little brush tool to clean out the fabric lint in the bobbin case area.
Screwdriver: Depending on the machine brand, some come with a mini screwdriver, some with a disc shaped screwdriver. Either way, keep this nearby in case you need to open up the plate of the machine, or change the needle.
Spool Caps: Typically a few of these are included in 2 different sizes, they go on top of the thread. They are to hold on the thread spool and keep it spinning smoothly.
Pictured below, left to right:
Standard foot, Zipper foot, Buttonhole foot,
Button Foot, Overcast foot, Blindstitch foot,
Seam Rippers, Disc shaped Screwdriver


Comments